

- You can use the
zapier-platform invokecommand to invoke a trigger, search, create, or an authentication method locally or remotely. - You can write unit tests for your Zapier integration that run locally, outside of the Zapier editor.
- You can run these tests in a CI tool like Travis.
Using zapier-platform invoke Command
Added in v15.17.0.
The zapier-platform invoke <ACTION_TYPE> <ACTION_KEY> CLI command emulates how the Zapier production environment would invoke your integration. Since it runs code locally, it’s a fast way to debug and test interactively without needing to deploy the code to Zapier.
Its general execution flow involves calling operation.inputFields of an action, resolving the input data to the expected types, and then calling the operation.perform method.
zapier-platform invoke --help has detailed documentation, but here’s a quick rundown:
zapier-platform invoke --remote (or -r) to invoke your integration code remotely in Zapier’s production environment.
Writing Unit Tests
From v10 ofzapier-platform-cli, we recommend using the Jest testing framework. After running zapier-platform init you should find an example test to start from in the test directory.
Before v10,
zapier-platform init project templates used
Mocha for the test framework. Now we recommend Jest.Using the z Object in Tests
Introduced in core@11.1.0, appTester can now run arbitrary functions:
Mocking Requests
It’s useful to test your code without actually hitting any external services. Nock is a Node.js utility that intercepts requests before they ever leave your computer. You can specify a response code, body, headers, and more. It works out of the box withz.request by setting up your nock before calling appTester.
Running Unit Tests
To run all your tests do:You can also go directly with
npm test or node_modules/.bin/jest.Testing & Environment Variables
The best way to store sensitive values (like API keys, OAuth secrets, or passwords) is in an.env (or .environment, see below note) file (learn more). Then, you can include the following before your tests run:
.env is the new recommended name for the environment file since v5.1.0. The
old name .environment is deprecated but will continue to work for backward
compatibility.Remember: NEVER add your secrets file to version control!
export them explicitly and place them into the environment:
Testing in Your CI
Whether you use Travis, Circle, Jenkins, or another service, we aim to make it painless to test in an automated environment. Behind the sceneszapier-platform test does a standard npm test, which could be Jest or Mocha, based on your project setup.
This makes it straightforward to integrate into your testing interface. For example, if you want to test with Travis CI, the .travis.yml would look something like this:
zapier-platform test with npm test, or a direct call to node_modules/.bin/jest. We recommend putting environment variables directly into the configuration screens Jenkins, Travis, or other services provide.
Alternatively to reading the deploy key from root (the default location), you may set the ZAPIER_DEPLOY_KEY environment variable to run privileged commands without the human input needed for zapier-platform login. We suggest encrypting your deploy key in the manner your CI provides (such as these instructions, for Travis).
Debugging Tests
Sometimes tests aren’t enough, and you may want to step through your code and set breakpoints. The testing suite is a regular Node.js process, so debugging it doesn’t take anything special. Because we recommendjest for testing, these instructions will outline steps for debugging w/ jest, but other test runners will work similarly. You can also refer to Jest’s own docs on the subject.
To start, add the following line to the scripts section of your package.json:
node to inspect the jest processes, which is exactly what we need.
Next, add a debugger; statement somewhere in your code, probably in a perform method:
inspecting, or a starting point for our manual inspection.
Next, you’ll need an inspection client. The most available one is probably the Google Chrome browser, but there are lots of options. We’ll use Chrome for this example. In your terminal (and in your integration’s root directory), run yarn test:debug (or npm run test:debug). You should see the following:
Discover Network Targets is checked and you should see a path to your jest file on your local machine:
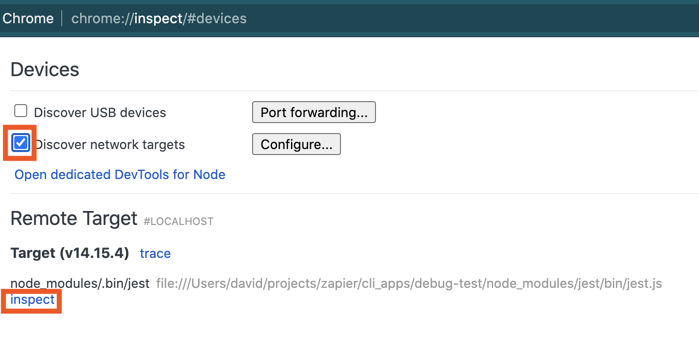 Click
Click inspect. A new window will open. Next, click the little blue arrow in the top right to actually run the code:
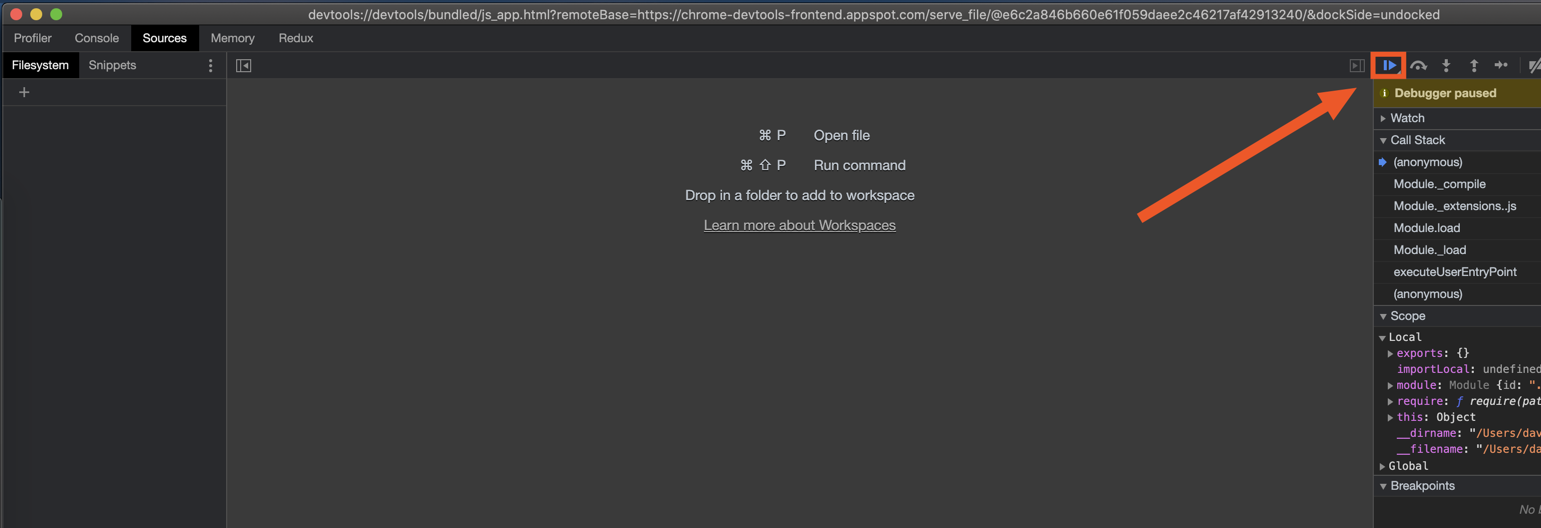 After a few seconds, you’ll see your code, the
 debugger statement, and info about the current environment on the right panel. You should see familiar data in the Locals section, such as the response variable, and the z object.
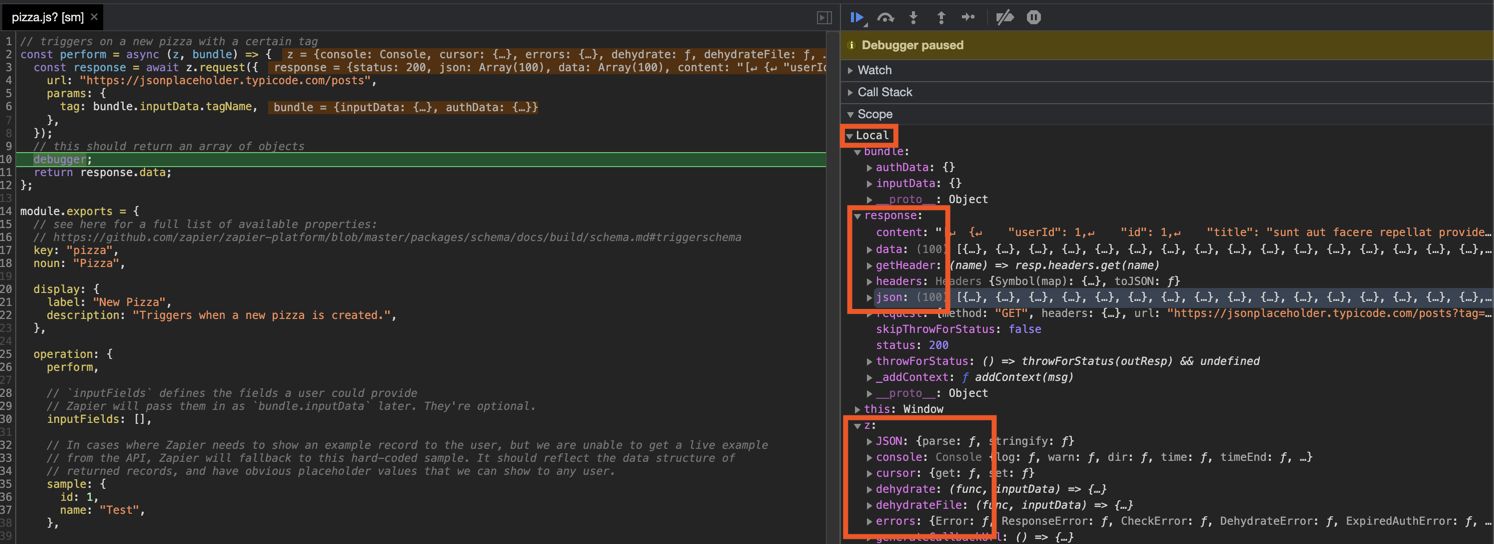 Debugging combined with thorough unit tests will hopefully equip you in keeping your Zapier integration in smooth working order.